FormEditor
The purpose of the component is to generate a collection of the forms to a databases and secondly an user's interface for the adaptation of these forms. The product of the form-editor is a description of the forms as a XML-document. Associations (Relationship) and other abstractions are supported in the forms directly. The user of the form-editor (application-developer) must not know the schema of the data. His task is only to adapt the automatically produced forms under the formative face point or to specify the input fields of the form.
A form becomes as a collection of different input fields, their placement, and their correspondence to objects in the databases (rows in a table). The following types of the input fields were realized:
| Frames. Frames for the placement of the elements |
| Simple text fields (one-line) |
| Input fields for whole numbers with control arrows |
| Listsbox |
| Radiobuttons |
| Checkbox fields (Yes / No switches) |
| Text fields consisting of several lines |
| Multicolumn Listboxes for the representation of the foreign key (references) |
| FormLinks |
| Object for the nesting forms |
GUI-Editor for forms
An GUI-Editor is opened by the double click on a form in main window. With it the appearance of the form and the linkages to table-columns in the database can be specified.
The Properties of the elements are slitted to three types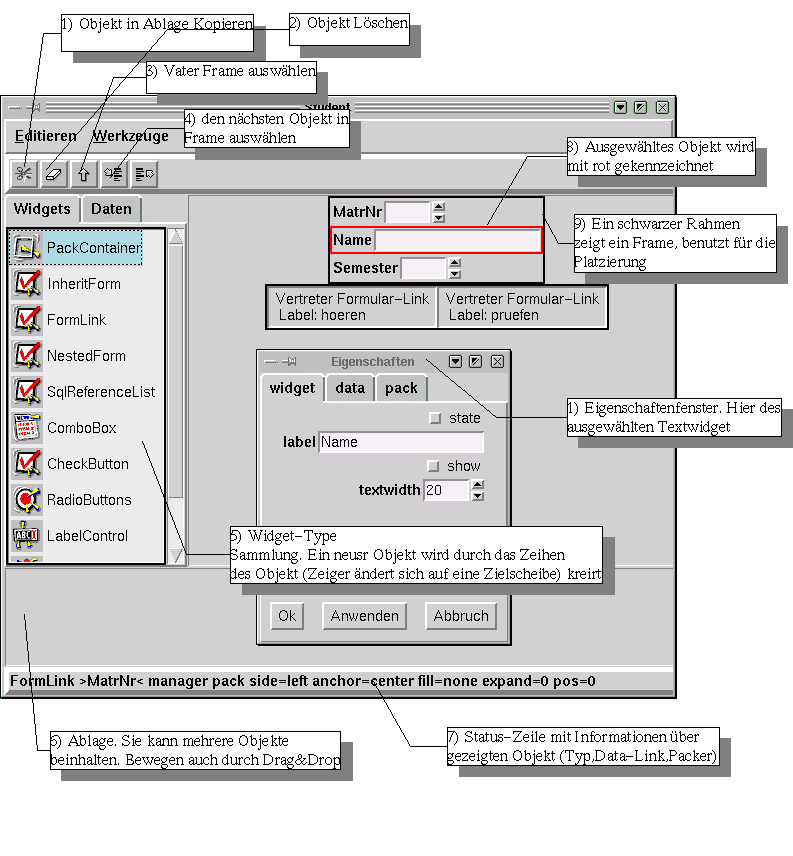
- Widget
The Properties, which belong to GUI-object such length, width (visual appearance).
- Data
Linkage with tables-column. Default value and not-null
- Packer
Information to placement of the element
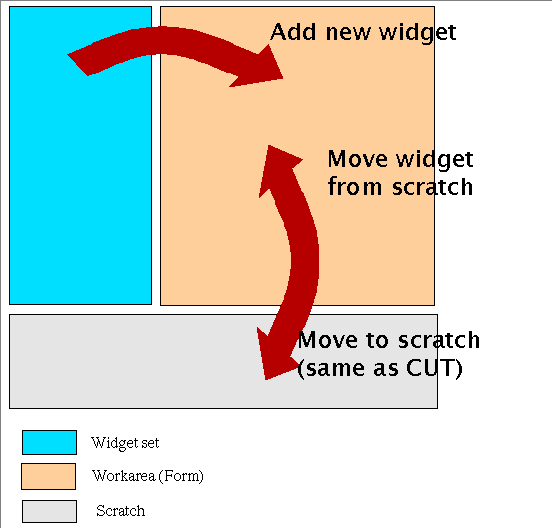
Drag and Drop in FormEditor
The GUI-Editor is slitted in 3 area.
| Widget set |
| Workbench with your edited form |
| scratch depository |
 | By inserting new widget, choose one widget in widget-set (the background is displayed colored) window and drop it on workbench. |
work with Pack-Frame
The elements are places in Frames (also nested). The order of the elements in a frame is crucial. The pack-geometry-manager takes one after another the elements and places them(her) in the frame the remaining place it is applied for the next elements. The following qualities specify the placement:
| Side - in which page(side) of the frames the object should be added |
| Anchor - anchor to which page side |
| Fill |
| Expand - the object should be adapted by change of the window size |
| One can see the current pack options in the status bar, after pointing the Widgets with mouse's pointer. |
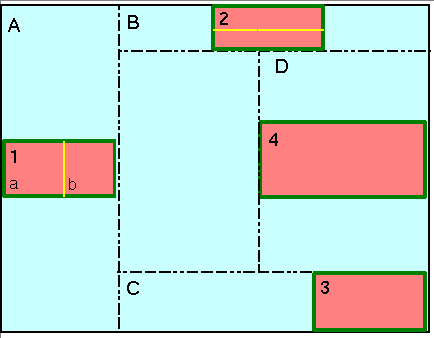
For each master the packer maintains an ordered list of slaves called the packing list. The -in, -after, and -before configuration options are used to specify the master for each slave and the slave's position in the packing list. If none of these options is given for a slave then the slave is added to the end of the packing list for its parent. The packer arranges the slaves for a master by scanning the packing list in order. At the time it processes each slave, a rectangular area within the master is still unallocated. This area is called the cavity; for the first slave it is the entire area of the master. For each slave the packer carries out the following steps:
The packer allocates a rectangular parcel for the slave along the side of the cavity given by the slave's -side option. If the side is top or bottom then the width of the parcel is the width of the cavity and its height is the requested height of the slave plus the -ipady and -pady options. For the left or right side the height of the parcel is the height of the cavity and the width is the requested width of the slave plus the -ipadx and -padx options. The parcel may be enlarged further because of the -expand option (see ``EXPANSION'' below)
The packer chooses the dimensions of the slave. The width will normally be the slave's requested width plus twice its -ipadx option and the height will normally be the slave's requested height plus twice its -ipady option. However, if the -fill option is x or both then the width of the slave is expanded to fill the width of the parcel, minus twice the -padx option. If the -fill option is y or both then the height of the slave is expanded to fill the width of the parcel, minus twice the -pady option.
The packer positions the slave over its parcel. If the slave is smaller than the parcel then the -anchor option determines where in the parcel the slave will be placed. If -padx or -pady is non-zero, then the given amount of external padding will always be left between the slave and the edges of the parcel.
working with Grid-Frame
The row and column are computed dynamic.
Figure 5 show one Grid-Frame. The cells A2,B2,B3,C1,C3 are occupied. By dropping in the free cell this cell will be used for placement. If you target one occupied cell one row or column will be added. See Example. If you target on cell B2, area d one row above the cell will be added.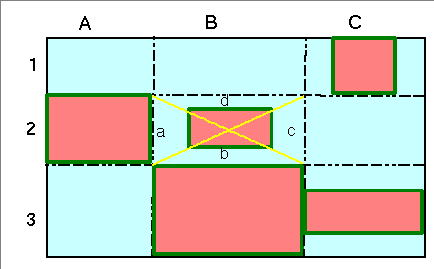
The another grid option as sticky or rowspan can be edited by widget-propries dialog.